Bitlocker To Goを試す

さて、Windows7(Windows Server 2008 R2)から新しく搭載されたBitlocker To Goを試しました。

そもそも、Bitlocker To Goとは何か?

BitLocker To Goは、Windows 7やWindows Server 2008 R2で新たに採用された、USBメモリなどリムーバブルディスクを暗号化する機能になります。BitLocker To Goを使えば、USBメモリの内容を自動的に暗号化することができるんですね。

今までは各メーカーごとに専用のアプリが用意されていてそれを使用していましたが、これからはメーカー関係なく使用できるということですね。

ということでUSBメモリを暗号化してみます。

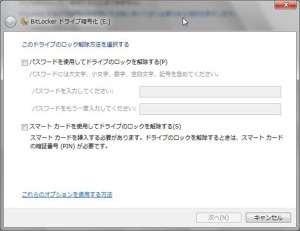
コントロールパネルより「BitLockerドライブ暗号化」を選択します。

後はUSBメモリに対して、BitLockerを有効にするをクリックしてウィザードに従って設定をするだけ

WS000000

まずはパスワードの設定

WS000001

回復キーをとりあえずファイルに保存します

WS000002

保存場所の指定

WS000003

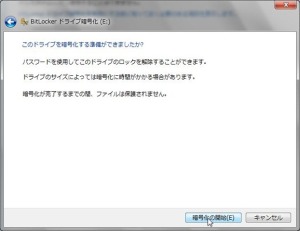
そして暗号化の開始です

WS000004

2GのUSBですが結構時間がかかりました。10分以上はかかったな

WS000005

終了です

WS000006

終了するとBitLockerの設定を行うことができます

WS000007

私は自動的にロックを解除する設定にしました。これで暗号化を意識せずに使用できます。

ちなみにVistaやXPでは[BitLocker To Go Reader]がUSBに入っているのでそれを起動してパスワードを入力すれば、読み取り専用として使用することができます。

USB暗号化の目的は、やはりUSBメモリの紛失時にデータが漏れることですので、通常使用時は自動的に解除でもいいのかな~なんて思っています。これなら使い勝手も今までと何ら変わりありませんしね。

Windows7のショートカットキー

Windows7を使い始めました

使っていくとこのOSの癖などがだんだんとわかってきます。が、そもそも私はデスクトップのカスタマイズなどはほとんど行わないで使っています。本当は自分なりにカスタマイズして使っていけば便利なんでしょうけどね

そこで使っていてちょっと困ったことがあります。それはタスクバーに全タスク最小化のアイコンがなくなっていることです。ここ最近タスクバーの使いやすさには感心しているのですが一旦全タスク最小化したいな~なんて思うことがあります。が、そのアイコンがないので(本当はあるんでしょうが・・・)どうすれば最小化できるのか調べてみました。

Windows7で使用できるショートカットキー(すべてではありませんが)

Win + ← 左にドッキング(ウィンドウを画面左半分に表示する)
Win + → 右にドッキング(ウィンドウを画面右半分に表示する)
Win + ↑ 最大化
Win + ↓ 元に戻す/最小化
Win + Shift + ↑ 上下にドッキング
Win + Home アクティブ以外を最小化/元に戻す
Win + Space Peek(透明化)
Win + Shift + ← 左のモニタに移動
Win + Shift + → 右のモニタに移動
Win + G ガジェット最前列
Win + D デスクトップ On/Off
Win + P ディスプレイの切り替え
Win + X モビリティセンター
Win + [+]/[-] ズームイン・アウト
Win + T タスクバーにフォーカス
Win + TAB フリップ3D


特に今回必要なのは「Win + D」ですね

また、自宅では24インチの画面を使用しているので「Win + 矢印」は結構使うかも

いや~、このようなショートカットキーを使いこなすと便利ですね。

Windows Server 2008のTCP/IPパラメータ値に関して

ネットを徘徊していたら有用な情報を見つけましたので忘れないうちにメモ

HKEY_LOCAL_MACHINE/SYSTEM/CurrentControlSet/Services/Tcpip/Parameters

配下のパラメーター設定情報になります。

以下は抜粋情報になります。検索に引っ掛かりやすいようにね!

ここから********************************************************

ArpRetryCount

Key: TcpipParameters

Value Type: REG_DWORD—Number

Valid Range: 0–3

Default: 3

Description: This value controls the number of times that the computer sends a gratuitous Address Resolution Protocol (ARP) Request message for its own IPv4 address(es) while initializing. Gratuitous ARP requests are sent to ensure that the IPv4 address is not already in use on the locally attached subnet. The value controls the actual number of ARP requests sent, not the number of retries.

ArpUseEtherSNAP

Key: TcpipParameters

Value Type: REG_DWORD—Boolean

Valid Range: 0, 1 (false, true)

Default: 0 (false)

Description: This value controls how IPv4 packets are encapsulated on Ethernet subnets. Setting this value to 1 forces TCP/IP to transmit Ethernet packets using IEEE 802.3 Sub-Network Access Protocol (SNAP) encapsulation. By default, the TCP/IP stack transmits packets in Ethernet II format, also known as Ethernet DIX format. It always receives both formats.

DefaultTTL

Key: TcpipParameters

Value Type: REG_DWORD—Number of hops

Valid Range: 0–0xff (0–255 decimal)

Default: 128

Description: Specifies the default time-to-live (TTL) value set in the header of outgoing IPv4 packets. The TTL determines the maximum number of links on which an IPv4 packet is allowed to travel before being discarded.

DisableDHCPMediaSense

Key: TcpipParameters

Value Type: REG_DWORD—Boolean

Valid Range: 0, 1 (false, true)

Default: 0 (false)

Description: This value can be used to control DHCP Media Sense behavior. If set to 1, the DHCP client ignores Media Sense events from the interface. By default, Media Sense events trigger the DHCP client to take an action, such as attempting to obtain a lease when a connect event occurs, or invalidating the interface and routes when a disconnect event occurs.

DisabledComponents

Key: Tcpip6Parameters

Value Type: REG_DWORD

Valid Range: 0-FF

Default: 0

Description: This value can be used to modify IPv6 capabilities. The DisabledComponents registry value is a bit mask that controls the following series of flags, starting with the low order bit (Bit 0):

· Bit 0 Set to 1 to disable all IPv6 tunnel interfaces, including the Intra-site Automatic Tunnel Addressing Protocol (ISATAP), 6to4, and Teredo tunnel interfaces. Default value is 0. For more information about ISATAP, 6to4, and Teredo, see IPv6 Transition Technologies at http://technet.microsoft.com/en-us/library/bb726951.aspx.

· Bit 1 Set to 1 to disable all 6to4-based interfaces. Default value is 0.

· Bit 2 Set to 1 to disable all ISATAP-based interfaces. Default value is 0.

· Bit 3 Set to 1 to disable all Teredo-based interfaces. Default value is 0.

· Bit 4 Set to 1 to disable IPv6 over all non-tunnel interfaces, including LAN interfaces and Point-to-Point Protocol (PPP)-based interfaces. Default value is 0.

· Bit 5 Set to 1 to modify the default prefix policy table to prefer IPv4 to IPv6 when attempting connections. Default value is 0.

You must restart the computer for the changes to the DisabledComponents registry value to take effect.

DisableIPSourceRouting

Key: TcpipParameters, Tcpip6Parameters

Value Type: REG_DWORD—Boolean

Valid Range: 0, 1, 2

0 – forward all packets
1 – do not forward source routed packets
2 – drop all incoming source routed packets

Default: 1 for IPv4 and 0 for IPv6

Description: IP source routing is a mechanism that allows the sender to determine the IP route that a packet should take through the network. The Ping and Tracert tools have command-line options to specify source routing.

DisableMediaSenseEventLog

Key: TcpipParameters

Value Type: REG_DWORD—Boolean

Valid Range: 0, 1 (false, true)

Default: 0 (false)

Description: This value can be used to disable logging of DHCP Media Sense events. By default, Media Sense events (connection/disconnection from the network) are logged in the event log for troubleshooting purposes.

DisableTaskOffload

Key: TcpipParameters

Value Type: REG_DWORD—Boolean

Valid Range: 0, 1 (false, true)

Default: 0 (false)

Description: This value instructs the TCP/IP stack to disable offloading of tasks to the network adapter for troubleshooting and testing purposes.

EnableAddrMaskReply

Key: TcpipParameters

Value Type: REG_DWORD—Boolean

Valid Range: 0, 1 (false, true)

Default: 0 (false)

Description: This value controls whether the computer responds to an Internet Control Message Protocol (ICMP) address mask request.

EnableBcastArpReply

Key: TcpipParameters

Value Type: REG_DWORD—Boolean

Valid Range: 0, 1 (false, true)

Default: 1 (true)

Description: This value controls whether the computer responds to an ARP request when the source Ethernet address in the ARP request is not unicast. Network Load Balancing Service (NLBS) will not work properly if this value is set to 0.

EnableICMPRedirect

Key: TcpipParameters

Value Type: REG_DWORD–BOOLEAN

Valid Range: 0, 1 (False, True)

Default: 1 (True)

Recommendation: 0 (False)

Description: This value controls whether the TCP/IP stack will update its IPv4 routing table in response to ICMP Redirect messages that are sent to it by network devices such as a routers.

EnableMulticastForwarding

Key: TcpipParameters

Value Type: REG_DWORD—Boolean

Valid Range: 0, 1 (false, true)

Default: 0 (false)

Description: The routing service uses this value to control whether or not IP multicasts are forwarded. This value is created by the Routing and Remote Access service.

EnablePMTUBHDetect

Key: TcpipParameters

Value Type: REG_DWORD—Boolean

Valid Range: 0, 1 (false, true)

Default: 1 (true)

Description: Setting this value to 1 (true) causes TCP to try to detect path maximum transmission unit (PMTU) black hole routers while doing PMTU discovery. A PMTU black hole router does not return ICMP Destination Unreachable messages when it needs to fragment an IPv4 packet that has the Don’t Fragment flag set. TCP depends on receiving these messages to perform PMTU discovery. With this feature enabled, TCP tries to send segments without the Don’t Fragment flag set if several retransmissions of a segment go unacknowledged. If the segment is then acknowledged, the TCP maximum segment size (MSS) for the connection is decreased and the Don’t Fragment flag is set for subsequent segments. Enabling PMTU black hole detection increases the maximum number of retransmissions that are performed for a given segment.

EnablePMTUDiscovery

Key: TcpipParameters

Value Type: REG_DWORD—Boolean

Valid Range: 0, 1 (false, true)

Default: 1 (true)

Description: When this value is set to 1 (true), TCP attempts to discover the maximum transmission unit (MTU), or largest packet size, over the path to a remote host. By discovering the path MTU (PMTU) and limiting TCP segments to this size, TCP can eliminate fragmentation at routers along the path that connects networks with different MTUs. Fragmentation adversely affects TCP throughput and network congestion. Setting this value to 0 (not recommended) causes an MTU of 576 bytes to be used for all connections that are not to destinations on a locally attached subnet.

IGMPLevel

Key: TcpipParameters

Value Type: REG_DWORD—Number

Valid Range: 0,1,2

Default: 2

Description: This value determines to what extent the system supports IPv4 multicasting and participates in the Internet Group Management Protocol (IGMP). At level 0, the system provides no multicast support. At level 1, the system can send IPv4 multicast packets but cannot receive them. At level 2, the system can send IPv4 multicast packets and fully participate in IGMP to receive multicast packets.

IGMPVersion

Key: TcpipParameters

Value Type: REG_DWORD—Number

Valid Range: 2, 3, 4

Default: 4

Description: This value specifies the version of IGMP to use. Specify 2 for IGMP version 1, 3 for IGMP version 2, or 4 for IGMP version 3.

IPAutoconfigurationMask

Key: TcpipParameters

Value Type: REG_SZ—String

Valid Range: A valid IP subnet mask

Default: 255.255.0.0

Description: This value controls the subnet mask assigned to the client using Automatic Private IP Addressing (APIPA) autoconfiguration. This value can only be set globally.

IPAutoconfigurationSubnet

Key: TcpipParameters

Value Type: REG_SZ—String

Valid Range: A valid IP subnet

Default: 169.254.0.0

Description: This value controls the initial address prefix used by APIPA autoconfiguration when selecting an IPv4 address for the client. This value can only be set globally.

IPEnableRouter

Key: TcpipParameters

Value Type: REG_DWORD—Boolean

Valid Range: 0, 1 (false, true)

Default: 0 (false)

Description: This value controls whether the TCP/IP stack will behave as an IPv4 router. Setting this value to 1 (true) causes the TCP/IP stack to forward unicast IP packets that have a destination address that is not assigned to an interface of the stack.

KeepAliveInterval

Key: TcpipParameters

Value Type: REG_DWORD—time in milliseconds

Valid Range: 1–0xFFFFFFFF

Default: 1000 (one second)

Description: This value determines the interval between TCP keep-alive retransmissions until a response is received. Once a response is received, the delay until the next keep-alive transmission is again controlled by the KeepAliveTime registry value. The connection is aborted after 10 retransmissions have gone unanswered.

KeepAliveTime

Key: TcpipParameters

Value Type: REG_DWORD—time in milliseconds

Valid Range: 1–0xFFFFFFFF

Default: 7,200,000 (two hours)

Description: This value controls how often TCP attempts to verify that an idle connection is still intact by sending a keep-alive packet. If the remote system is still reachable and functioning, it acknowledges the keep-alive transmission. Keep-alive packets are not sent by default. This feature may be enabled on a connection by an application.

MTU

Key: TcpipParametersInterfacesinterfaceGUID

Value Type: REG_DWORD—number

Valid Range: From 576 to the MTU of the underlying network

Default: 0xFFFFFFFF

Description: This value overrides the default Maximum Transmission Unit (MTU) for a network interface. The MTU is the maximum IP packet size, in bytes, that can be transmitted over the underlying network. For values larger than the default for the underlying network, the network default MTU is used. For values smaller than 576, the MTU of 576 is used. This setting only applies to IPv4.

Note: Windows Vista TCP/IP uses path MTU (PMTU) detection by default and queries the network adapter driver to find out what local MTU is supported. Altering the MTU value is typically not necessary and might result in reduced performance.

PerformRouterDiscovery

Key: TcpipParametersInterfacesinterfaceGUID

Value Type: REG_DWORD

Valid Range: 0, 1, 2

0 (disabled)
1 (enabled)
2 (enable only if DHCP sends the Perform Router Discovery option)

Default: 2, DHCP-controlled but off by default.

Description: This value controls whether the TCP/IP stack attempts to perform IPv4 router discovery (RFC 1256) on a per-interface basis. See also SolicitationAddressBcast.

SolicitationAddressBcast

Key: TcpipParametersInterfacesinterfaceGUID

Value Type: REG_DWORD

Valid Range: 0, 1 (false, true)

Default: 0 (false)

Description: This value controls whether the TCP/IP stack will send IPv4 router discovery messages as broadcasts instead of multicasts (RFC 1256). By default, if IPv4 router discovery is enabled, router discovery solicitations are sent to the all-routers multicast group (224.0.0.2). See also PerformRouterDiscovery.

Tcp1323Opts

Key: TcpipParameters

Value Type: REG_DWORD—number (flags)

Valid Range: 0 or 2

0 (disable the use of the TCP timestamps option)
2 (enable the use of the TCP timestamps option)

Default: No value.

Description: This value controls the use of the RFC 1323 TCP Timestamp option. The default behavior of the TCP/IP stack is to not use the Timestamp options when initiating TCP connections, but use them if the TCP peer that is initiating communication includes them in their synchronize (SYN) segment.

TcpAckFrequency

Key: TcpipParametersInterfacesinterfaceGUID

Value Type: REG_DWORD—number

Valid Range: 0–255

Default: 2

Description: Specifies the number of TCP acknowledgements (ACKs) that will be outstanding before the delayed ACK timer is ignored. Microsoft does not recommend changing this value from the default without careful study of the environment.

TcpDelAckTicks

Key: TcpipParametersInterfacesinterfaceGUID

Value Type: REG_DWORD—number

Valid Range: 2–6

Default: 2

Description: Specifies the number of 100-millisecond intervals to use for the delayed-ACK timer on a per-interface basis. By default, the delayed-ACK timer is 200 milliseconds. If you set this value to 0 or 1, the delayed-ACK time is 200 milliseconds. Microsoft does not recommend changing this value from the default without careful study of the environment.

TcpFinWait2Delay

Key: TcpipParameters

Value Type: REG_DWORD—number

Valid Range: 30–294,967,295

Default: 120

Description: This value controls the maximum number of seconds that a TCP connection will remain in the FIN_WAIT_2 state. For more information, see RFC 793.

TcpMaxDataRetransmissions

Key: TcpipParameters

Value Type: REG_DWORD—number

Valid Range: 0–0xFFFFFFFF

Default: 5

Description: This value controls the number of times that TCP retransmits an individual data segment (not connection request segments) before aborting the connection. The retransmission time-out is doubled with each successive retransmission on a connection and is reset when responses resume. The Retransmission Timeout (RTO) value is dynamically adjusted, using the historical measured round-trip time (the smoothed round trip time) on each connection.

TcpTimedWaitDelay

Key: TcpipParameters

Value Type: REG_DWORD—time in seconds

Valid Range: 30-300 (decimal)

Default: 0x78 (120 decimal)

Description: This value determines the length of time that a connection stays in the TIME_WAIT state when being closed. While a connection is in the TIME_WAIT state, the socket pair cannot be reused. This is also known as the 2MSL state because the value should be twice the maximum segment lifetime on the network. For more information, see RFC 793.

TcpUseRFC1122UrgentPointer

Key: TcpipParameters

Value Type: REG_DWORD—Boolean

Valid Range: 0, 1 (false, true)

Default: 0 (false)

Description: This value determines whether TCP uses RFC 793 or RFC 1122 to interpret the value of the Urgent Pointer field in the TCP header. RFC 793 defines the value as indicating the first byte of normal data. RFC 1122 defines the value as indicating the last byte of urgent data. These two interpretations are not interoperable. Windows Vista and Windows Server 2008 TCP/IP defaults to the RFC 793 interpretation (used by BSD-derived systems).

ここまで**************************************************
Windows Server BackupをPowerShellで操作する

またまた、検証してみました

今回はWindows Server BackupをPowerShellからいじってみました。まずはインストールです

PowerShell

サーバーマネージャーの機能より「Windows Server Backup バックアップの機能」の「コマンドラインツール」を選択します。ここで間違えてはいけないのがWSBのコマンドラインであるwbadminは「Windows Server Backup バックアップ」を選択するとGUIのツールと一緒にインストールされます。「コマンドラインツール」はWindows PowerShell のコマンドレット (スナップイン)がインストールされます。

しかし、これですぐにPowerShell 上でインストールされたスナップインが使えるわけではありません。

PowerShell 上で次のコマンドをたたくことによって組み込まれます

PS C:> Add-PSSnapin windows.serverbackup

ここで本当に組み込まれたか確認

PS C:> Get-PSSnapin

Name        : Microsoft.PowerShell.Core
PSVersion   : 1.0
Description : この Windows PowerShell スナップインには、Windows PowerShell のコンポーネントを管理するために使用する Windows PowerShell 管理コマンドレットがあります。

Name        : Microsoft.PowerShell.Host
PSVersion   : 1.0
Description : この Windows PowerShell スナップインには、Windows PowerShell ホストで使用するコマンドレットが含まれています。

Name        : Microsoft.PowerShell.Management
PSVersion   : 1.0
Description : この Windows PowerShell スナップインには、Windows コンポーネントの管理に使用する管理コマンドレットが含まれています。

Name        : Microsoft.PowerShell.Security
PSVersion   : 1.0
Description : この Windows PowerShell スナップインには、Windows PowerShell のセキュリティを管理するためのコマンドレット が含まれています。

Name        : Microsoft.PowerShell.Utility
PSVersion   : 1.0
Description : この Windows PowerShell スナップインには、データの操作に使用できるユーティリティ コマンドレットが含まれて います。

Name        : windows.serverbackup
PSVersion   : 1.0
Description :

このスナップインを追加することによって15個のコマンドレットが追加されました。ということで確認してみます。

PS C:> Get-Command -CommandType cmdlet | Where-Object{$_.ImplementingType -like “*wb*”}| Format-Table name

Name
—-
Add-WBBackupTarget
Add-WBVolume
Get-WBBackupTarget
Get-WBDisk
Get-WBPolicy
Get-WBSchedule
Get-WBSummary
Get-WBVolume
New-WBBackupTarget
New-WBPolicy
Remove-WBBackupTarget
Remove-WBPolicy
Remove-WBVolume
Set-WBPolicy
Set-WBSchedule

現在接続されているディスクの状況を確認してみます。

PS C:> Get-WBDisk

DiskName       : FUJITSU MHY2160BH ATA Device
DiskNumber     : 0
DiskId         : 7c297c29-0000-0000-0000-000000000000
TotalSpace     : 160041885696
FreeSpace      : 54449995776
Volumes        : {Microsoft.Windows.ServerBackup.Commands.WBVolume, Microsoft.Windows.ServerBackup.Commands.WBVolume}
Properties     : None
ContainsBackup : False
BackupVolumeId : 00000000-0000-0000-0000-000000000000

DiskName       :
DiskNumber     : 1
DiskId         : 760cb29f-0000-0000-0000-000000000000
TotalSpace     : 1000204886016
FreeSpace      : 999959649280
Volumes        : {Microsoft.Windows.ServerBackup.Commands.WBVolume}
Properties     : External, ValidTarget
ContainsBackup : False
BackupVolumeId : 00000000-0000-0000-0000-000000000000

それでは外付けHDDをバックアップディスクとする設定をこれから行います。ちなみに外付けHDDはDiskNumberが1です。ですので$diskを変数として設定します。

PS C:> $disk = Get-WBDisk | where{$_.DiskNumber -eq 1}
PS C:> $disk

DiskName       :
DiskNumber     : 1
DiskId         : 760cb29f-0000-0000-0000-000000000000
TotalSpace     : 1000204886016
FreeSpace      : 999959649280
Volumes        : {Microsoft.Windows.ServerBackup.Commands.WBVolume}
Properties     : External, ValidTarget
ContainsBackup : False
BackupVolumeId : 00000000-0000-0000-0000-000000000000

ターゲットディスクの設定です。

PS C:> $tgt = New-WBBackupTarget -Disk $disk -Label “NewBackup”
PS C:> $tgt

Label                  : NewBackup
WBDisk                 : Microsoft.Windows.ServerBackup.Commands.WBDisk
Path                   :
TargetType             : Volume
PreserveExistingBackup : False

そしてポリシーの作成です。まだ何も入っていませんね。

PS C:> $pol = New-WBPolicy
PS C:> $pol

Schedule                                BackupTargets                           VolumesToBackup
——–                                ————-                           —————


ここでポリシーを追加します。

PS C:> Add-WBBackupTarget -Policy $pol -Target $tgt

Label                  : NewBackup
WBDisk                 : Microsoft.Windows.ServerBackup.Commands.WBDisk
Path                   :
TargetType             : Volume
PreserveExistingBackup : False

次にどのボリュームをバックアップするかを指定します。まずは全体のボリューム情報の確認です。

PS C:> Get-WBVolume -AllVolumes

VolumeLabel :
MountPath   : D:
MountPoint  : ?Volume{c948a59a-4794-11dd-995f-806e6f6e6963}
FileSystem  : NTFS
Property    : ValidSource
FreeSpace   : 25328717824
TotalSpace  : 52428800000

VolumeLabel :
MountPath   : C:
MountPoint  : ?Volume{c948a59b-4794-11dd-995f-806e6f6e6963}
FileSystem  : NTFS
Property    : Critical, ValidSource
FreeSpace   : 29117566976
TotalSpace  : 107610112000

VolumeLabel : HD-CNU2
MountPath   : F:
MountPoint  : ?Volume{1d553c30-7d8c-11de-afe2-001cc4d190f9}
FileSystem  : FAT32
Property    : None
FreeSpace   : 999958052864
TotalSpace  : 1000202241024

今回はC:ドライブをバックアップしますので指定します。

PS C:> $vol = Get-WBVolume -AllVolumes | Where{$_.MountPath -eq “C:”}
PS C:> Add-WBVolume -Policy $pol -Volume $vol

VolumeLabel :
MountPath   : C:
MountPoint  : ?Volume{c948a59b-4794-11dd-995f-806e6f6e6963}
FileSystem  : NTFS
Property    : Critical, ValidSource
FreeSpace   : 29117517824
TotalSpace  : 107610112000

そしてスケジュールの指定です。とりあえず変数$schedにぶち込みます。

PS C:> $sched = [datetime]”07/08/2009 16:00:00″
PS C:> $sched

2009年7月8日 16:00:00

当然ながらまだこの状態ではポリシーを見てもスケジュールされていません。

PS C:> $pol | fl

Schedule        :
BackupTargets   : {Microsoft.Windows.ServerBackup.Commands.WBBackupTarget}
VolumesToBackup : {Microsoft.Windows.ServerBackup.Commands.WBVolume}

ではスケジュールを設定します。

PS C:> Set-WBSchedule -Policy $pol -Schedule $sched

2009年8月7日 16:00:00

これでポリシーを確認するとスケジュールが入っていますね

PS C:> $pol | fl

Schedule        : {2009/08/07 16:00:00}
BackupTargets   : {Microsoft.Windows.ServerBackup.Commands.WBBackupTarget}
VolumesToBackup : {Microsoft.Windows.ServerBackup.Commands.WBVolume}

じゃあ、バックアップの設定をしますか~このHDDは初めて接続するのでフォーマットしちゃいます

PS C:> Set-WBPolicy -Policy $pol

警告!
をフォーマットしますか?
[Y] はい(Y)  [A] すべて続行(A)  [N] いいえ(N)  [L] すべて無視(L)  [S] 中断(S)  [?] ヘルプ (既定値は “Y”): y

ここで全体のボリューム確認

PS C:> Get-WBVolume -AllVolumes

VolumeLabel :
MountPath   : D:
MountPoint  : ?Volume{c948a59a-4794-11dd-995f-806e6f6e6963}
FileSystem  : NTFS
Property    : ValidSource
FreeSpace   : 25328717824
TotalSpace  : 52428800000

VolumeLabel :
MountPath   : C:
MountPoint  : ?Volume{c948a59b-4794-11dd-995f-806e6f6e6963}
FileSystem  : NTFS
Property    : Critical, ValidSource
FreeSpace   : 29117366272
TotalSpace  : 107610112000

VolumeLabel : NewBackup
MountPath   :
MountPoint  : ?Volume{1d553c33-7d8c-11de-afe2-001cc4d190f9}
FileSystem  : NTFS
Property    : None
FreeSpace   : 1000059502592
TotalSpace  : 1000183914496

確かに新しいHDDがNewBackupとして存在していますね

そしてサマリーを確認すると・・・

PS C:> Get-WBSummary

NextBackupTime                  : 2009/08/07 16:00:00
NumberOfVersions                : 0
LastSuccessfulBackupTime        : 0001/01/01 0:00:00
LastSuccessfulBackupTargetPath  :
LastSuccessfulBackupTargetLabel :
LastBackupTime                  : 0001/01/01 0:00:00
LastBackupTarget                :
LastBackupResultHR              : 0
LastBackupResultDetailedHR      : 0
CurrentOperationStatus          : NoOperationInProgress
DetailedMessage                 :

確かにスケジュールがされているのがわかりますね。

PS C:> Get-WBSummary

NextBackupTime                  : 2009/08/08 16:00:00
NumberOfVersions                : 1
LastSuccessfulBackupTime        : 2009/08/07 16:00:01
LastSuccessfulBackupTargetPath  : ?Volume{1d553c33-7d8c-11de-afe2-001cc4d190f9}
LastSuccessfulBackupTargetLabel : NewBackup
LastBackupTime                  : 2009/08/07 16:00:01
LastBackupTarget                : NewBackup
LastBackupResultHR              : 0
LastBackupResultDetailedHR      : 0
CurrentOperationStatus          : NoOperationInProgress
DetailedMessage                 :

バックアップが終わりました~

やっとActive Directory Recycle Binを試しました

いや~、やっといろいろと検証を行う時間が取れるようになりました。

そこで、R2の機能でActive Directory Recycle Binを試してみました。この話は既に安納さんのブログをみるといろいろと検証しているので楽にできるかな?なんて思っていました。

まずは、環境作成です。私の場合はHyper-V環境にR2を入れ込んでDCをそのまま立てましたのでフォレスト機能レベルもR2にしました。これで条件は整っています。

が、フォレスト機能レベルがR2だからと言って初期設定ではActive Directory Recycle Binは有効ではありません。そこで有効にするためにはPowershellを使ってコマンドをたたかなくてはいけません。(ただし、RTMではGUIからできるかも?)

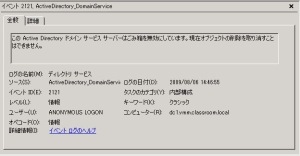
ちなみに現在の状態をイベントログで確認すると次のようになっています。ID2120,2121

イベント2120

イベント2121

[管理ツール]-[Active Directory PowerShell] を起動して

Enable-ADOptionalFeature –Identity ‘Recycle Bin Feature’ –Scope ForestOrConfigurationSet –Target 'vmm.classroom.local’

とたたきました。vmm.classroom.localはドメイン名ですね。

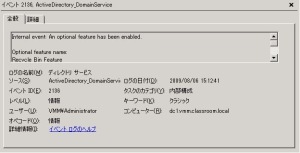
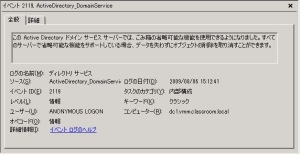
これで有効になりました。ちなみにこの状態のイベントログはID2136、2119

イベント2136

イベント2119

で確認できます。

さて、ここで本番

実際にユーザーを作成して、グループなんぞに入れてみて、削除してみます。

ここで本来ならldp.exeなどのツールを使用して復元するのでしょうがめんどくさい・・・

ここではadrestoreというツールを使用します。このツールはsysinternalsで提供されていますのでそれをDLして使います。

そしてコマンドプロンプトより

adrestore –r

そうすると、現在削除されているオブジェクトを見つけてくれて、復活する場合はyを押せば完了。見事に元にもどりました。また今まで所属していたグループにもきちんと入っています。

試しにOUとその配下にユーザーを作成して、OUごと削除してから、adrestoreを使って復元しました。

問題なしですね!

ただし、OUから復元しないといけないのでその点は注意が必要かな

いや~、これは便利です

R2を入れるのであれば、是非この機能はオンにするべきですね

Hyper-Vのエクスポート・インポートに関して

■エクスポート・インポート機能

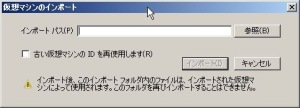
仮想マシンの構成情報、スナップショットの情報を含めて仮想マシンを移動する機能

仮想マシン毎に保持する関連ファイルを一括処理
・構成ファイル(.xml)
・仮想ディスク(.vhd)
・状態データ(.bin、.vsv)
・スナップショット(.avhd)

エクスポート

構成ファイルのみのエクスポートが可能

インポート

インポート時にIDの再使用可能
ただし、同一ホストに同じGUIDの仮想マシンがすでに存在する場合は、インポートエラーとなる

■エクスポート・インポート利用上の留意事項

パススルーディスクはエクスポート・インポートできない

より確実に仮想マシンの移動を行うには、全てのスナップショットを削除し、仮想マシンを停止した状態でエクスポートを行うことを推奨

仮想ネットワーク構成の設定
・<外部ネットワーク>の構成情報は、インポート時に初期化される。インポート後に、再設定する必要がある
・<内部ネットワーク>または<プライベートネットワーク>の構成情報は、同名の仮想ネットワークがある場合のみネットワーク情報も復元される

オフラインバックアップの手段として、エクスポートを使用する際は外部ネットワークの構成をインポート後に再構成する必要があることに注意する必要がある。

仮想マシンのバックアップに関して

オンラインバックアップ

Windows Server Backup(WSB)ホストレベルバックアップ を使用する方法

WSBとはWindows Server 2008に標準で搭載されているバックアップツールになります。

WSBはVSSに対応しているため、WSBを使用して仮想マシンを停止せずにバックアップすることが可能になります。

ただし、事前にHyper-VのVSSライタをWSBに登録する必要があります。

http://support.microsoft.com/kb/958662/

HKEY_LOCAL_MACHINESOFTWAREMicrosoftWindows NTCurrentVersionApplication Support{66841CD4-6DED-4F4B-8F17-FD23F8DDC3DE}Application Identifier

Application Support以下のキーは自分で作成する

REG_SZ:Hyper-V

必要なアップデートモジュール

■KB956697(VSS writerの問題を修正)
Windows Server 2008 Hyper-V VSS writer is not used during a backup job because of corrupted or invalid virtual machine configuration files
http://support.microsoft.com/?kbid=956697

■KB958665(ゲストOS復元後に正常に起動しない問題を修正)
You do not receive an error message after you restore a Windows Server 2008 Hyper-V virtual machine
http://support.microsoft.com/kb/958665/en-us

■KB971394(たまにバックアップが失敗する:特定のエラーが出たときに対処するHOTFIX)
A backup of virtual machines fails when you use the Hyper-V VSS writer to back up virtual machines concurrently on a computer that is running Windows Server 2008
http://support.microsoft.com/kb/971394/en-us

オンラインバックアップを行うための条件

・統合サービスがインストールされ、バックアップ統合サービスが無効になっていない。

・仮想マシンが使用しているすべてのディスクが、ゲスト オペレーティング システム内で NTFS 形式のベーシック ディスクとして構成されている。物理パーティションがダイナミック ディスクまたは FAT 32 ファイル システムとしてフォーマットされている記憶域を使用する仮想マシンでは、オンライン バックアップを実行できません。これは、バックアップおよび復元操作によって完全にサポートされている、容量可変の拡張ハード ディスクとは異なります。

・仮想マシンによって使用されているすべてのボリュームで、ボリューム シャドウ コピー サービスが特定の構成で有効になっている。各ボリュームを、ボリュームのシャドウ コピーを格納する記憶域として使用できることも必要です。たとえば、ボリューム C のシャドウ コピーの記憶域は C: である必要があります。

参考:Planning for Backup
http://technet.microsoft.com/ja-jp/library/dd252619(WS.10).aspx

オフラインバックアップ

オフラインバックアップに関しては2つのアプローチが考えられます。

  • Hyper-Vマネージャより、エクスポート(オフライン)を行う。そのエクスポートしたファイルをバックアップとして保管する方法。
  • WSBやSCDPMなどのバックアップツールを使用して、ホストマシンはオフラインにしてバックアップを取得する方法。

Hyper-Vにおけるパフォーマンスカウンタのまとめ

先日マイクロソフトが主催するセミナーに参加し得た情報を記載しておきます。意外とこの情報って見つからないんですよね~

主に着目すべきパフォーマンスカウンタと意味

■プロセッサの使用率
Hyper-Vホスト全体    :Hyper-V Hypervisor Logical Processor
ペアレントOS    :Hyper-V Hypervisor Root Vitual Processor
仮想マシン    :Hyper-V Hypervisor Vitual Processor

■Hyper-V Hypervisor Logical Processor(_Total)% Total Run Time
このカウンタは、ペアレントOSとすべてのゲストOSの実行に消費されたプロセッサー時間の使用率をパーセンテージで示します。% Total Run Timeは% Guest Run Timeと% Hypervisor Run Timeの合計値です。パフォーマンスの分析には、次の値を参考にしてください。

– 60%以下         =正常
– 60%~89%      =監視または注意が必要
– 90%~100%    =重大、パフォーマンスに悪影響

■Hyper-V Hypervisor Logical Processor(_Total)% Guest Run Time
このカウンタは、ゲストOSが消費した総プロセッサー時間の割合です。

■Hyper-V Hypervisor Logical Processor(_Total)% Hypervisor Run Time
このカウンタは、ハイパーバイザコードが消費した総プロセッサー時間の割合です。

■Memory% Committed Bytes In Use
このカウンタは、ページングファイルに対して領域が予約されている物理メモリの割合を示します。この値が常に高い値(90%以上)を示す場合、物理メモリとページングファイルの両方の追加が必要です。

■MemoryAvaiable Mbytes
このカウンタは、Hyper-Vホスト全体の物理メモリ容量に対する利用可能な秋メモリの割合を示します。パフォーマンスの分析には、次の値を参考にしてください。

-50%以上の空きメモリ      =正常
-25%の空きメモリ            =監視が必要
-10%の空きメモリ            =注意が必要
-5%以下の空きメモリ        =重大、パフォーマンスに悪影響

■MemoryPages/sec
このカウンタは、ハードページフォールトを解決するためにディスクから読み取られた、またはディスクへ書き込まれたページの数を示します。ハードページフォールトを解決するためには、OSはメモリの内容をディスクにスワップする必要があります。これは、パフォーマンスにネガティブな影響を与えます。このカウンタが過度のページ数を示す場合、物理メモリ容量が不足しています。パフォーマンスの分析には、次の値を参考にしてください。

-500以下        =正常
-500~1000    =監視または注意が必要
-1000以上      =重大、パフォーマンスに悪影響

■PhisicalDisk(*)Avg. Disk sec/ReadおよびAvg. Disk sec/Write
これらのカウンタは、ディスクからの読み取り平均時間(秒)およびディスクへの書き込み平均時間(秒)を示します。パフォーマンスの分析には、次の値を参考にしてください。この値は7200rpmの単一ディスクドライブの、キャッシュなしの一般的なシーク時間をベースとした目安になります。

-1ms~15ms      =正常
-16ms~25ms    =監視または注意が必要
-26ms以上         =重大、パフォーマンスに悪影響

■Hyper-V Virtual IDE ControllerRead Bytes/secおよびWrite Bytes/sec
これらのカウンタは、仮想マシンのIDEコントローラで1秒間に読み取られた、または書き込まれたバイト数を示します。

■Hyper-V Virtual Storage Device Error Count
このカウンタは、仮想マシンのディスク(VHDディスクまたはパススルーディスク)で発生したエラーの合計数を示します。ディスク単位で監視することが出来ます。

■Hyper-V Virtual Storage Device Read Bytes/secおよびWrite Bytes/sec
これらのカウンタは、仮想マシンのディスク(VHDディスクまたはパススルーディスク)から、1秒間に読み取られた、または書き込まれたバイト数を示します。ディスクごとのインスタンスを指定して、ディスク単位で監視することができます。

■Network Interface(*)Bytes Recived/secおよびBytes Sent/sec
このカウンタは、ネットワークアダプタ上で送受信されるバイト数を示します。これらの値の合計値(Bytes Total/sec)に8を掛けることで、使用帯域を示すBps(Bit/sec)値に変換することが出来ます。物理ネットワークの帯域幅に対する使用帯域のパーセンテージを計算することで、ネットワーク使用率を算出できます。パフォーマンスの分析には、次の値を参考にしてください。

-40%以下        =正常
-40%~64%    =監視または注意が必要
-65%~100%    =重大、パフォーマンスに悪影響

■Network Interface(*)Output Queue Length
このカウンタは、ネットワークアダプタの発信パケットのキューの長さを示します。このキューの長さが2より長い場合は、処理遅延が発生し、ボトルネックになります。その結果、ネットワークのパフォーマンスは低下し、コリジョンが多発する可能性があります。この問題を解消するには、物理ネットワークアダプタの追加と、追加したネットワークアダプタの仮想マシンへの割り当てが必要になります。パフォーマンスの分析には、次の値を参考にしてください。

-0             =正常
-1~2        =監視または注意が必要
-2以上       =重大、パフォーマンスに悪影響

■Hyper-V Virtual Network AdapterBytes Recived/secおよびBytes Sent/sec
これらのカウンタは、仮想ネットワークアダプタで1秒間に送受信されたバイト数を示します。

■Hyper-V Virtual SwitchBytes Received/sec,Bytes Sent/sec,Packets Flooded/sec
Bytes Received/secとBytes Sent/secは、仮想ネットワーク(スイッチ)で1秒間に送受信されたバイト数を示します。Packets Flooded/secは、仮想ネットワーク(スイッチ)でオーバーフローした1秒間あたりのパケット数を示します。

■Hyper-V Virtual Switch PortBytes Received/secおよびBytes Sent/sec
これらのカウンタは、仮想ネットワーク(スイッチ)のポート毎に、1秒間に送受信されたバイト数を示します。

Hypre-V スナップショットに関して

Hyper-Vのスナップショットはその時点の状態をメモリ情報も含め保存しておき、いつでもその保存した時点に戻ったりすることができる機能になります。

この機能を使えば、サービスパックの適用前にスナップショットを取っておき、その後適切な動作が行われないなどの不具合があるようなら適用前に戻るなんてこともできますね。

さて、ここで問題があります。それはパフォーマンスに関することになります。

Hyper-Vでのディスク構成としては

  1. 容量可変
  2. 容量固定
  3. パススルー

があります。

本番環境では容量固定が推奨になります。容量可変ではどうしてもHDDの拡張を行いながらの書き込みとなるため、そのオーバーヘッドが問題になる可能性があります。パススルーは仮想環境のメリットである「物理環境に依存しない」が失われるのでお勧めはしません。そもそも、パススルーをするようなサーバーを仮想環境に持ってくるのはいかがなものか?と考えてしまいます。まあ、これはあくまでも私の意見です。

さて、では本番環境で容量固定で使っていたとします。

そしてスナップショットを使うとどうなるか?(あくまでもスナップショットはテスト環境での使用を想定しているので、本番環境での使用は推奨しません

スナップショットを行うと、VMフォルダのsnapshotsホルダ内に[idフォルダ]が作られAVHDファイルに以後のデータが書き込まれるようになります。以後はこのスナップショット(AVHD)がHDDとして使用されます。このスナップショットは差分ディスク(容量可変)として動作しますので書き込みのパフォーマンスが問題になる場合がありますね。

でもしばらくはいつでも戻せる状態で運用したいなんてことがあるかも知れません。

そして1週間くらい使用して問題ないようなら容量固定に戻したい(スナップショットを削除したい)

ではどうやるの?

容量固定VHDとスナップショット(AVHD)の結合はスナップショットを削除すると自動で行われます

手順
1.バックアップ
2.エクスポート
3.シャットダウン時にスナップショットの削除を行う(シャットダウンしていないと結合が行われないので)
4.自動的に結合される(結合が完了するとAVHDが削除される)
5.全てのAVHDが無くなったことを確認してから起動
6.起動確認

ここで不測の事態が発生(起動できない)場合は、バックアップから復元するか、インポートを使用して元に戻す

ただし、DCやSQL、Exchange等の更新系のアプリが動いている環境では絶対に使用してはいけません

FSRMのファイルスクリーン

ファイルサーバーリソースマネージャー(FSRM)には次の機能があります。

  1. クォータの管理
  2. ファイル スクリーンの管理
  3. 記憶域レポートの管理

今回はファイルスクリーンの処理に関して述べてみます。

ファイルスクリーンとは特定の種類のファイルを会社のサーバーに保存することがセキュリティポリシーで禁じられている場合があります。例えば、iso、avi、wmvなど割と大きなファイルなどは対象になりそうですね。そんなときにこのファイルスクリーンを使用することによってサーバーに置かれた際通知をだしたり、そもそも置けなくするなどの処理を行うことができます。

このファイルスクリーンを運用する際の注意点として次のことがあげられます。


folder

たとえば、このようなフォルダ構成になっていて、上位のフォルダに対して実行形式ファイルの「パッシブスクリーン処理」とイベントログへ送信する設定を行います。

ちなみにファイルスクリーンの処理は2パターン

  • アクティブ:承認されていないファイルの保存を許可しない
  • パッシブ:承認されていないファイルの保存を許可する(監視用)

ここで本題

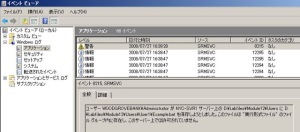
実行形式ファイルをTemp1フォルダにコピーします。そうすると、イベントログのアプリケーションには警告、イベントID8215が発生します。これは想定された動作になります。更にTemp2に対しても同じ動作をします。しかし、イベントログには上がってきません。

WS000000

実はこれってFSRMの通知間隔の問題なんです。デフォルトでは60分間隔で行われているため、その間は何度通知条件が発生しても通知は行われません。

通知間隔を確認するには

filescrm screen list /list-notifications

この通知間隔は変更することができるようです。

参考:KB926092

更に注意点があります。このファイルスクリーンのレポートを出すためには設定が必要なんです。

WS000001

この設定はファイルサーバーリソースマネージャーのオプションの構成>「ファイルスクリーンの監査」タブより設定します。この設定をしておかないといざレポートを見ようと思ってもみれません。私はこれではまりました・・・

WS000003

さてそれではこれでファイルスクリーンの監査レポートが見れる状態になりました。

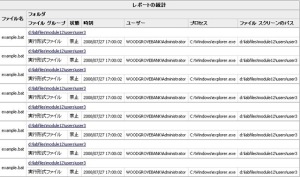
このとき、アクティブの設定をしていると、こんな監査レポートが上がります。

WS000002

このレポートを見る限り、なんと8回も繰り返し禁止されている操作をしているように見えますよね。しかし、どうやらこれは内部動作の仕様のようです。実際には1回コピーしようとしてはじかれただけなんですけどね。

さて、このことを考えるとあっという間にレポートの上限である1000を超えちゃいそうですね!

そこで安納さんのブログで紹介されている

【Management】FSRM 記憶域レポートの上限値を変更するには

が役にたつのではないでしょうか?

このようなことから、間違ってもユーザーがわざと禁止されている操作を繰り返し行っていると勘違いしないでくださいね(笑)